UPPCL employees need a secure VPN connection to access the RMS software. The VPN server runs on SoftEther VPN, and many users assume that the SoftEther client must be installed on their computers. It is not required. The server supports SSTP (Secure Socket Tunneling Protocol), and Windows already has a built-in SSTP client.
While Softether VPN provides an easy and documented way to connect to UPPCL Vpn. There are mainly two Issues faced by everyone.
- UPPCL IT team installs an Antivirus Software, Cylance, which hogs system resources even when vpn is not being used. A system with less RAM and CPU power suffers greatly.
- The user needs to enter the password repeatedly a few times.
This guide walks you through the whole setup, one click at a time, with screenshots. You only need to do the setup once. After that, connecting to RMS takes two clicks.
What you need before you start
- A laptop or desktop running Windows 10 or Windows 11 (screenshots are from Windows 11; Windows 10 is almost identical).
- A working internet connection.
- Your VPN username and password for RMS access (your employee ID is the username in this example).
- The VPN server address. In this guide, we use mvvpn.uppclonline.com. If your DISCOM has given you a different address, use that instead.
- No software download, no installer, and no administrator-level tools are needed.
Why is no extra software needed?
A VPN needs two parts: a server (run by UPPCL) and a client (on your computer). The server uses SoftEther, which can talk to several kinds of clients. One of them is SSTP, which Windows includes by default. SSTP wraps your traffic in an encrypted HTTPS tunnel (port 443), so it works on most office, home, and mobile-hotspot networks without special firewall settings.
Part 1: Create the VPN connection
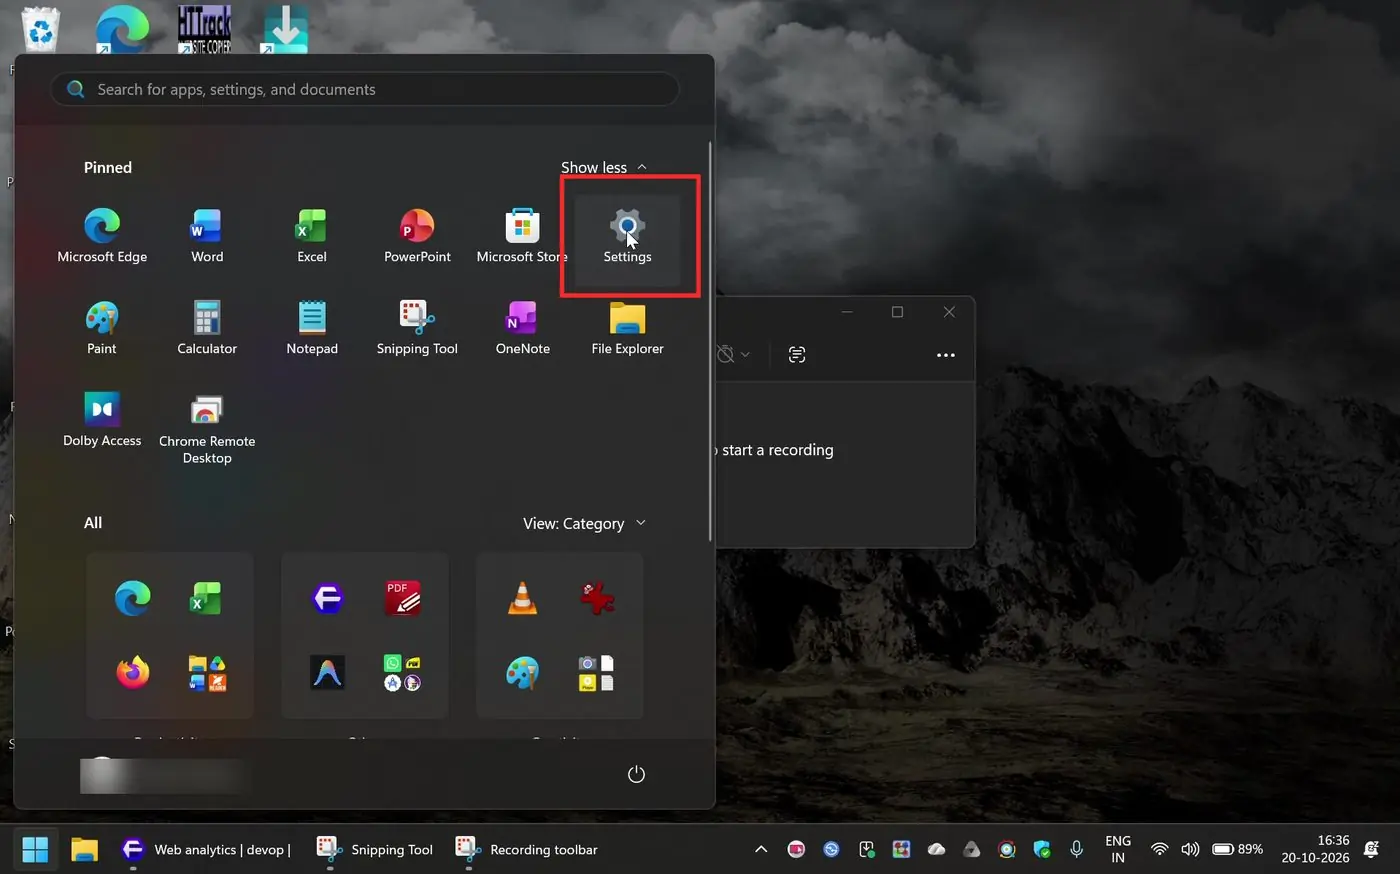
Step 1: Open Windows Settings
Click the Start button and then click Settings (the gear icon). You can also press Windows + I on your keyboard.
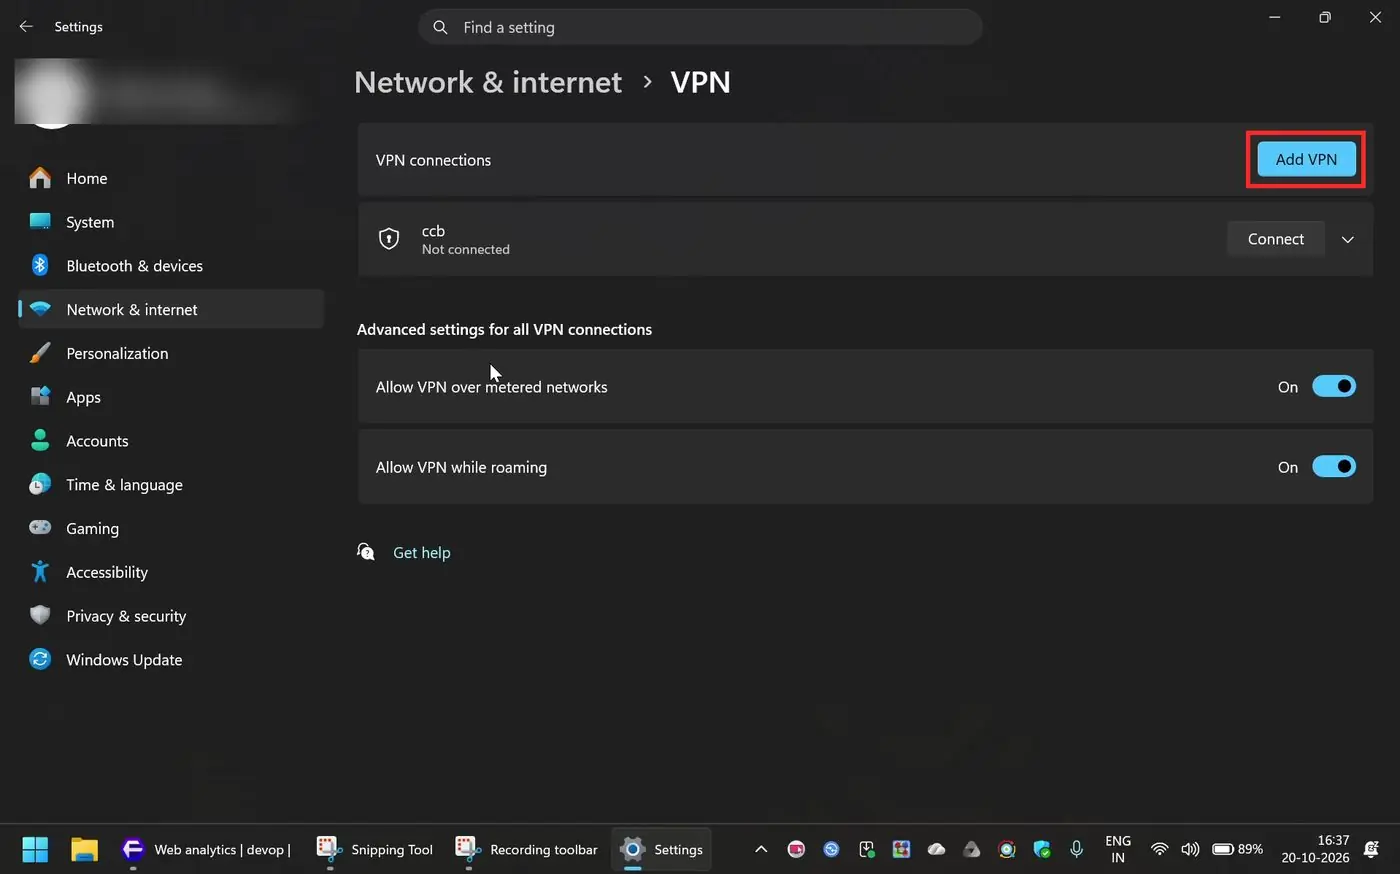
Step 2: Go to Network & internet, then VPN, then Add VPN
In the left panel, click Network & internet, then click VPN. On the VPN page, click the blue Add VPN button at the top right.
Step 3: Fill in the connection details
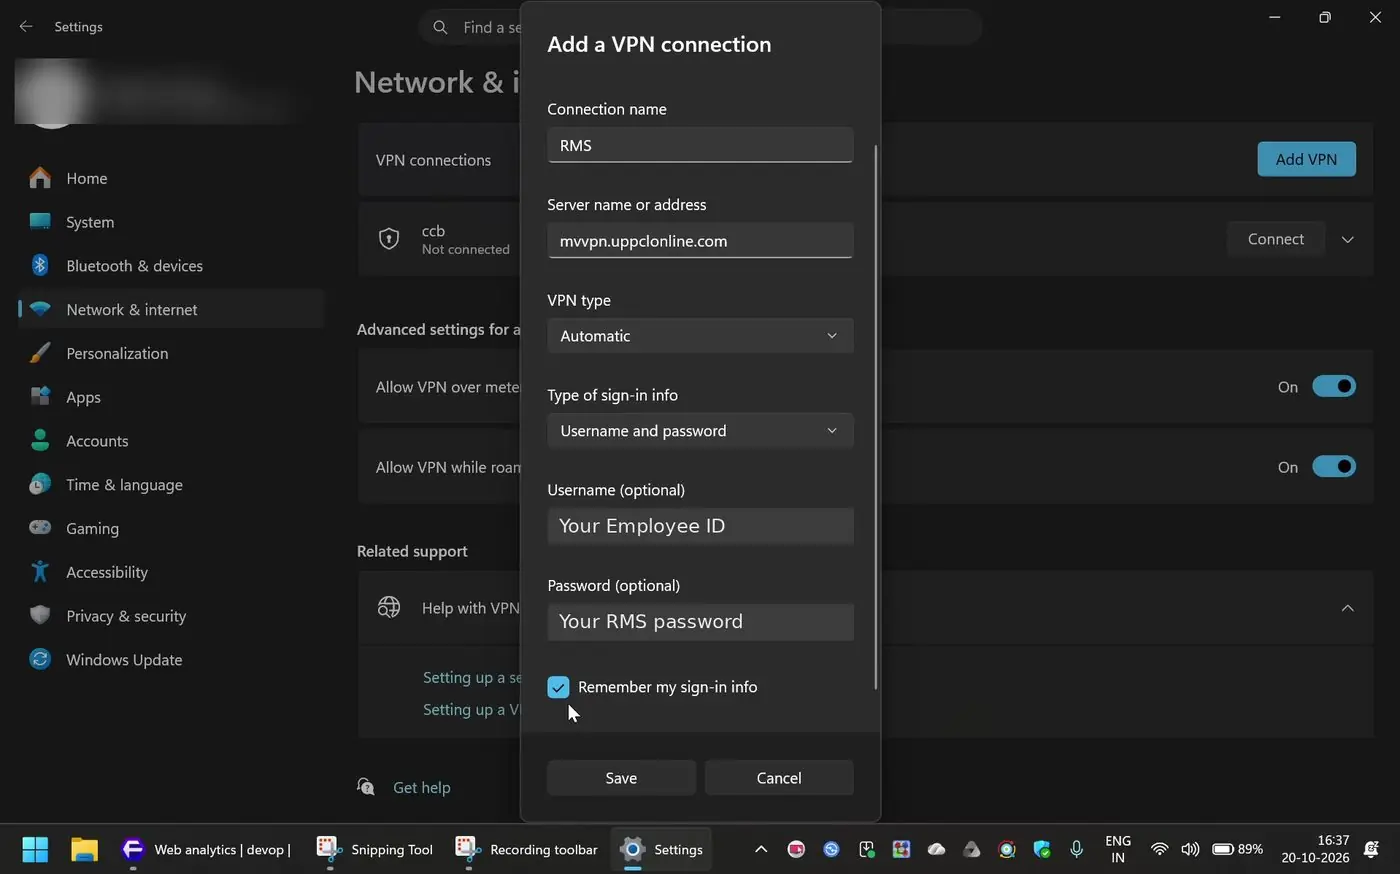
A window titled Add a VPN connection opens. Fill it in exactly as shown below:
- VPN provider: Windows (built-in)
- Connection name: RMS (any name you like; this is just a label)
- Server name or address: mvvpn.uppclonline.com
- VPN type: Automatic (Windows detects SSTP by itself). If you prefer, you can pick Secure Socket Tunneling Protocol (SSTP) from the list.
- Type of sign-in info: Username and password
- Username: your employee ID
- Password: your VPN/RMS password
- Tick Remember my sign-in info so you do not have to type the password every time.
- Click Save.
Step 4: Check that the connection was created
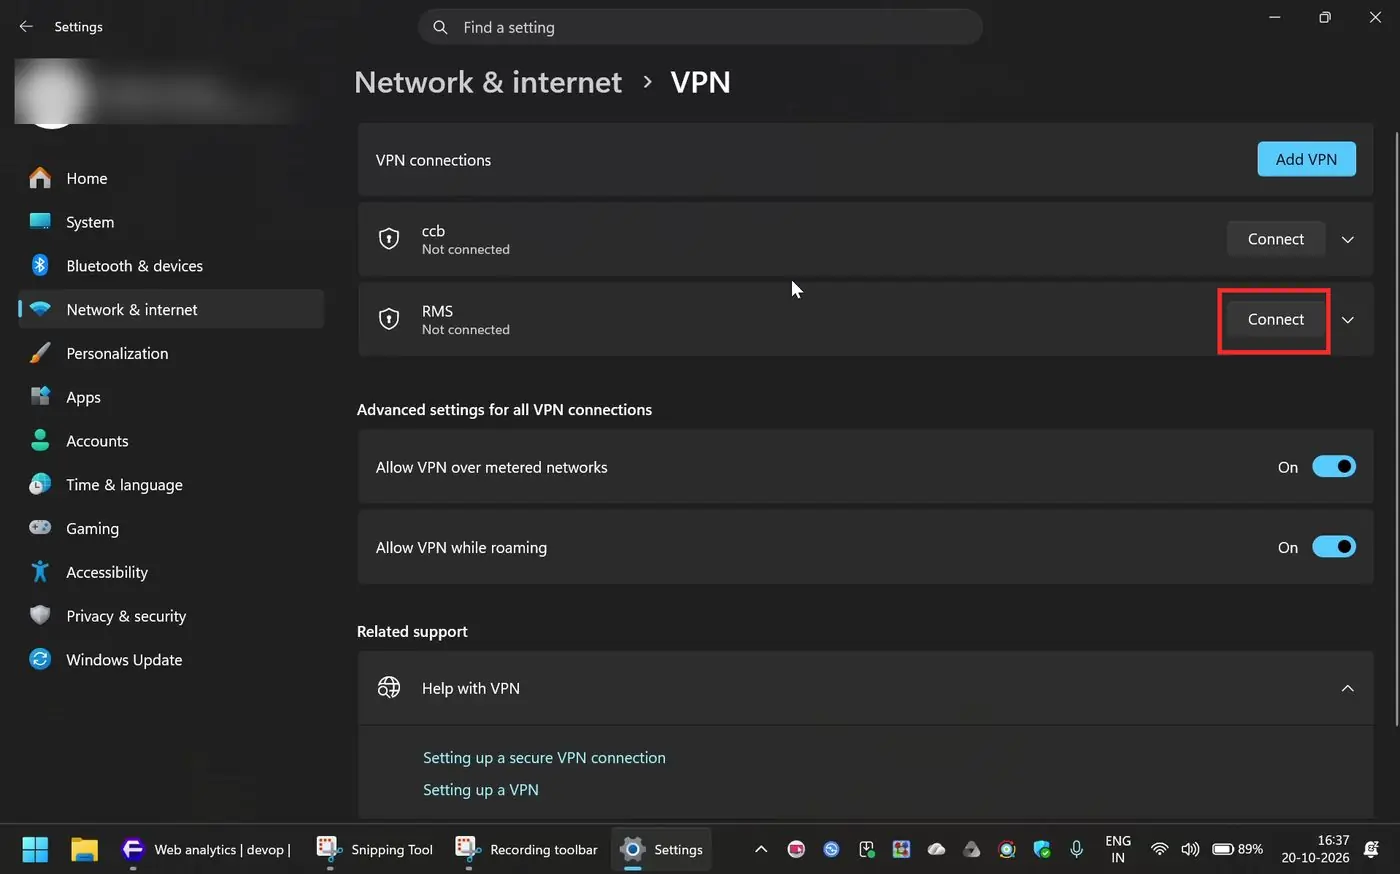
After saving, RMS appears in the VPN list with the status Not connected. Click the Connect button next to it.
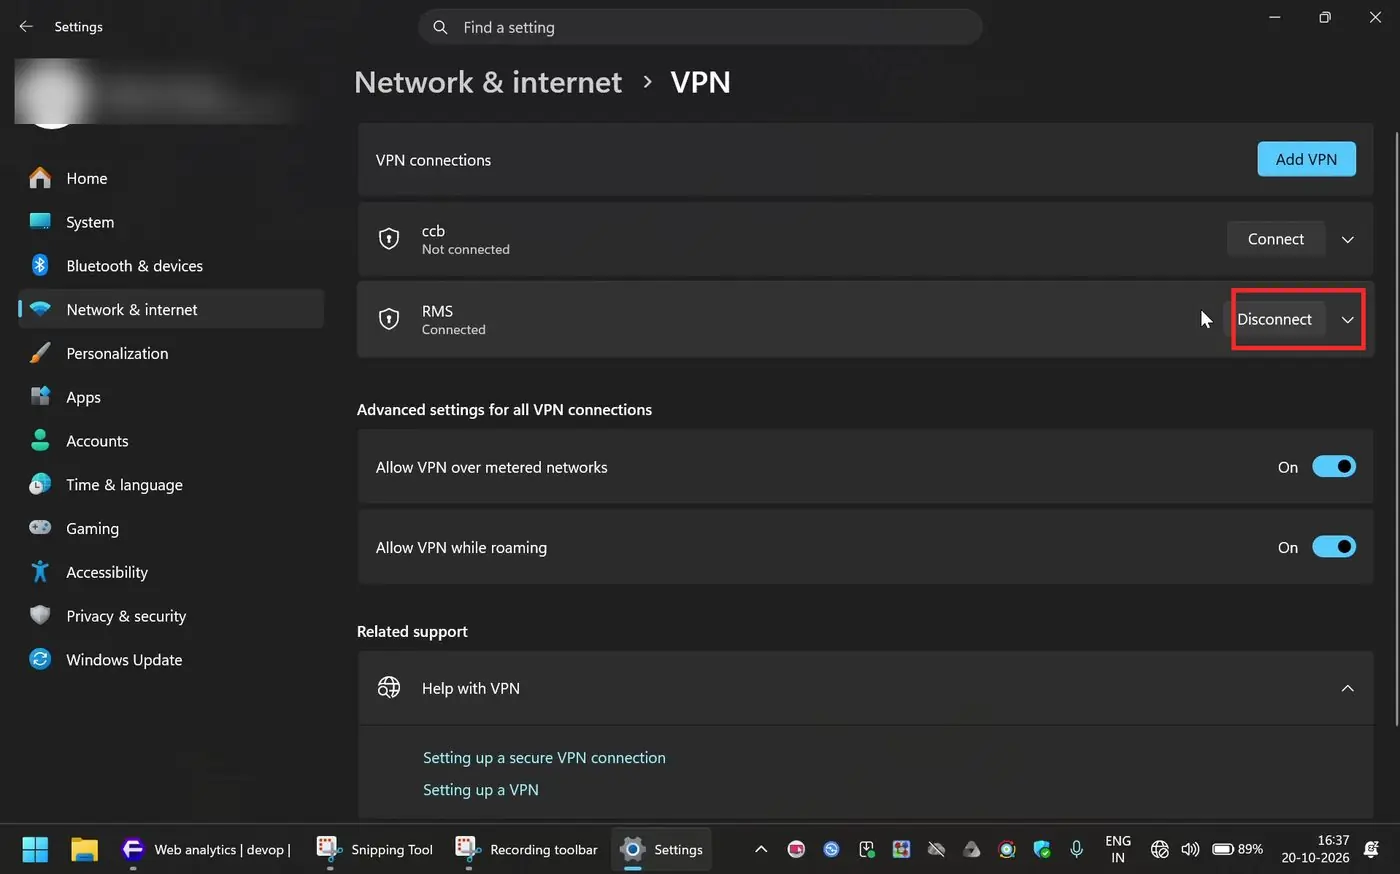
The status changes to Connecting, then Verifying your sign-in info, and finally Connected. The button changes to Disconnect.
Part 2: One-time advanced setting (Recommended)
By default, Windows sends all your internet traffic through the VPN while it is connected. This can make normal browsing slow and may block some websites. With the setting below, only the traffic meant for UPPCL's network goes through the VPN, and everything else (YouTube, Google, email) continues to use your normal internet connection. You need to do this only once.
Tip: do this while the VPN is disconnected. If it is connected, click Disconnect first.
Step 5: Open the Control Panel
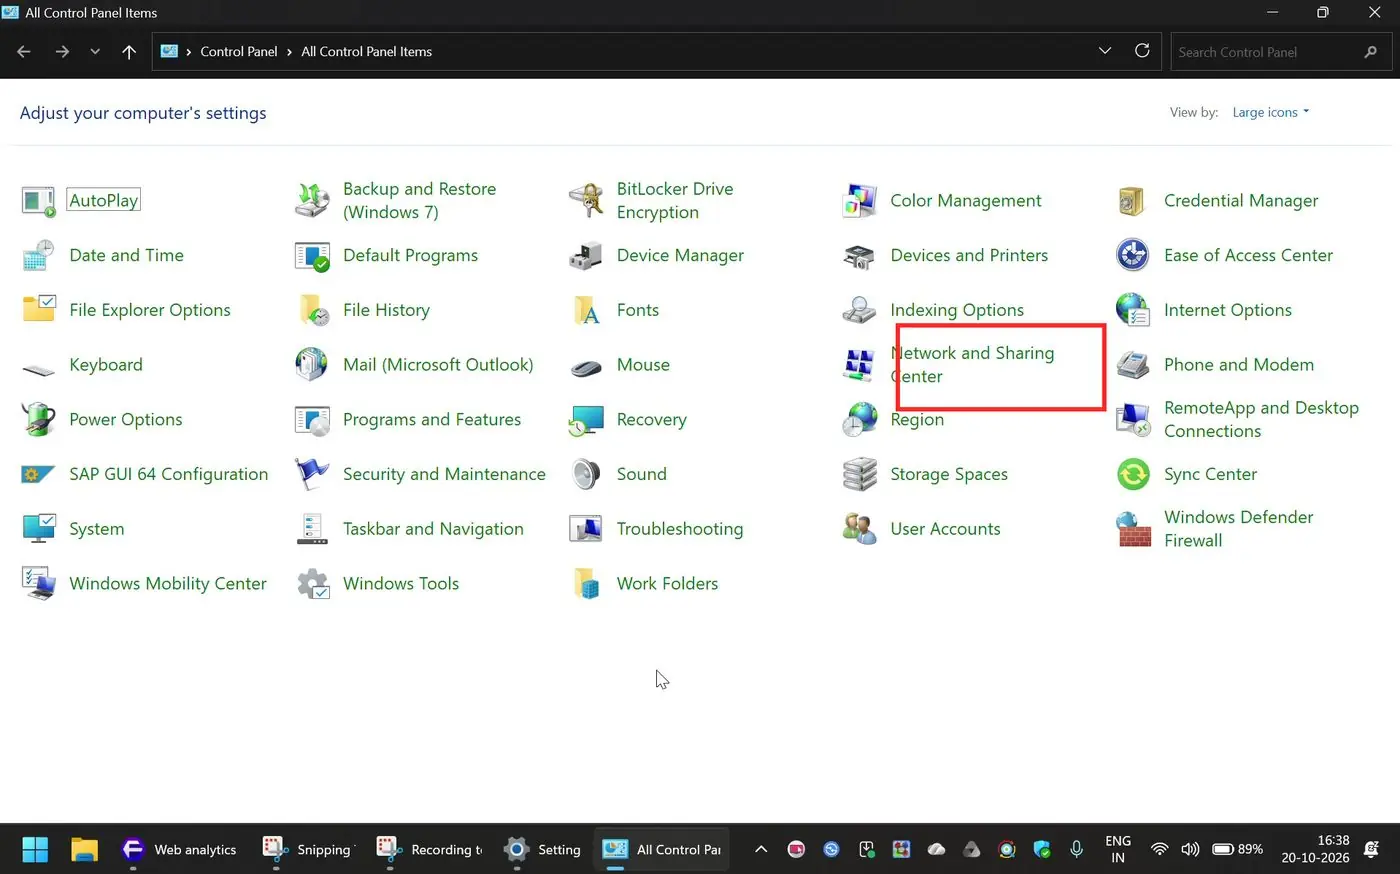
Click Start, type Control Panel, and press Enter. Set View to Large icons (top right) if needed, then click Network and Sharing Center.
Step 6: Open the adapter settings
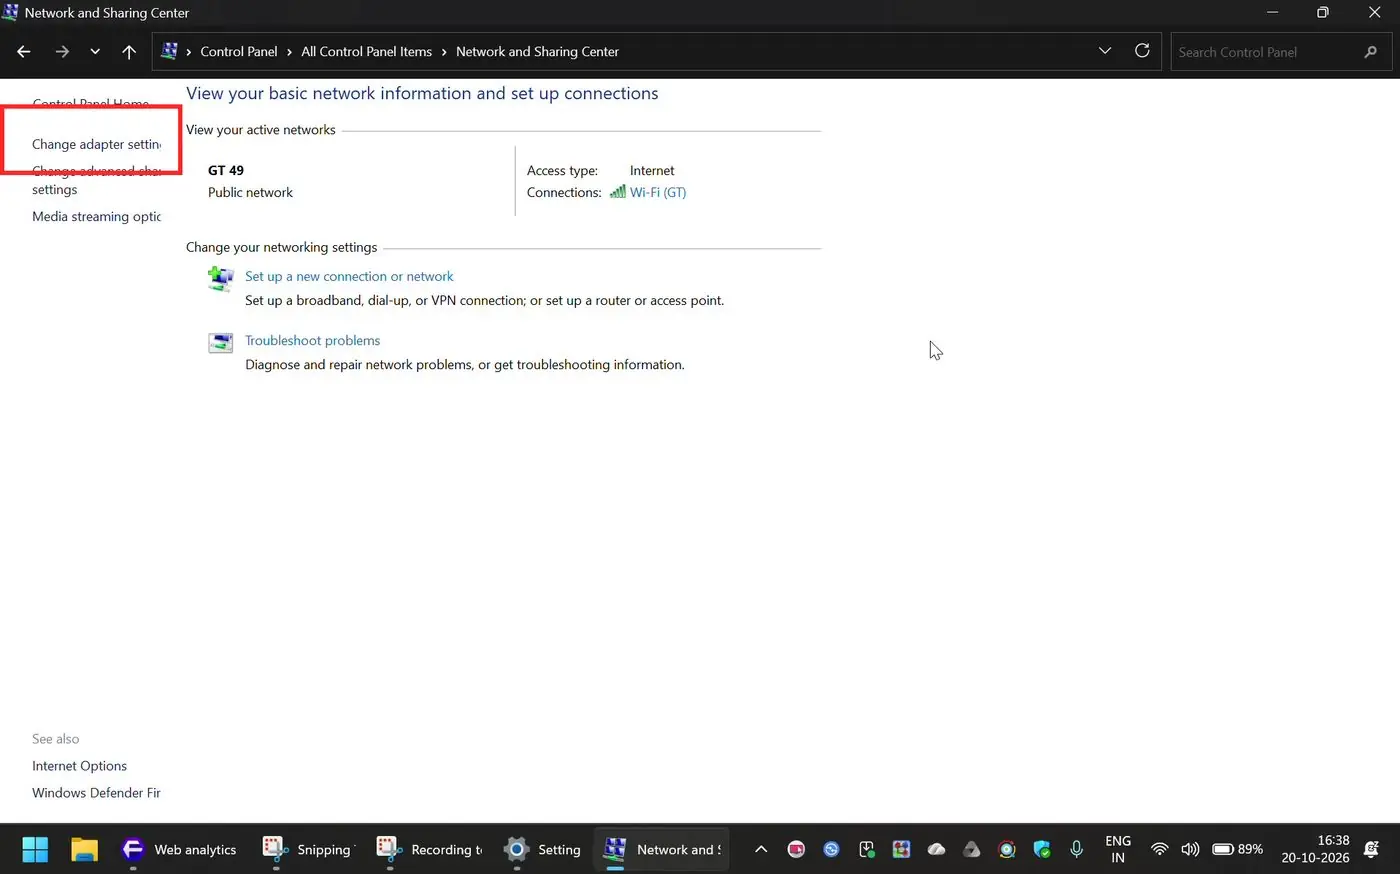
In the left panel of the Network and Sharing Center, click Change adapter settings.
Step 7: Open the properties of the RMS connection
You will see a list of network connections. Right-click RMS and choose Properties. Notice that the type under its name says WAN Miniport (SSTP). That confirms Windows is using the built-in SSTP protocol.
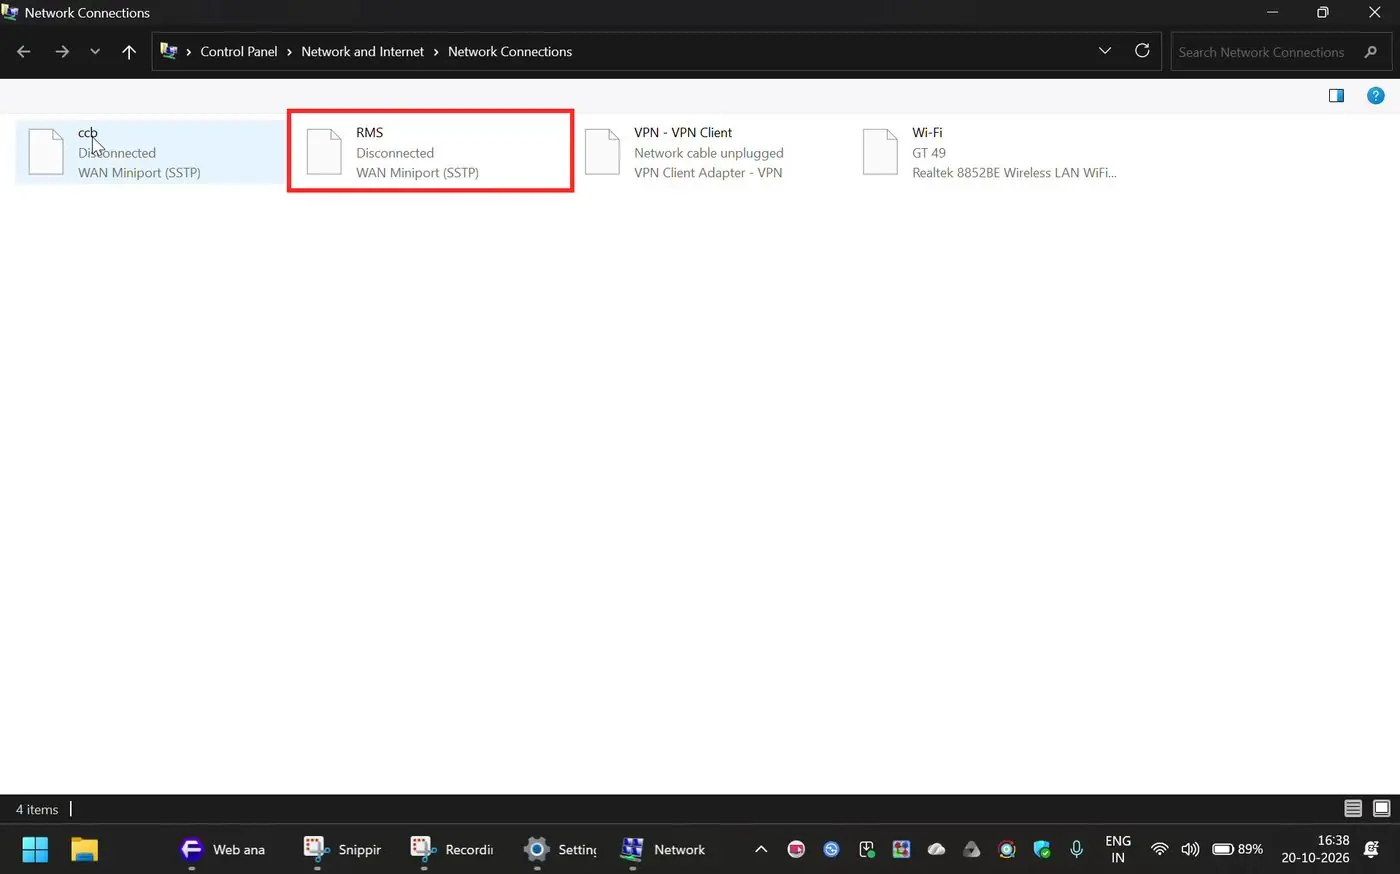
Step 8: Open the Internet Protocol Version 4 settings
In the RMS Properties window, click the Networking tab. Select Internet Protocol Version 4 (TCP/IPv4) in the list (do not untick it) and click Properties.
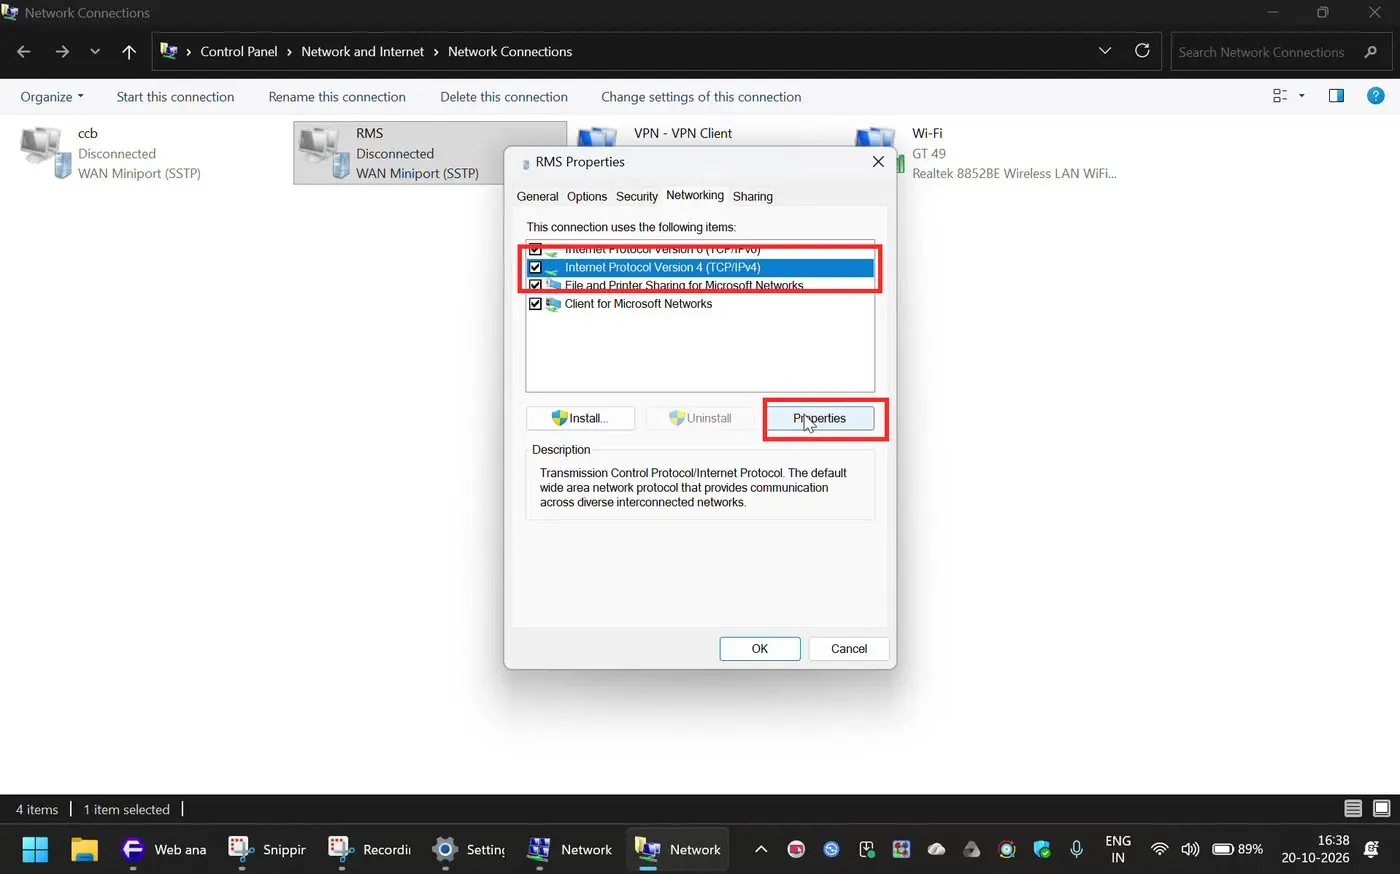
Step 9: Click Advanced
Keep Obtain an IP address automatically and Obtain DNS server address automatically selected, and click the Advanced button.
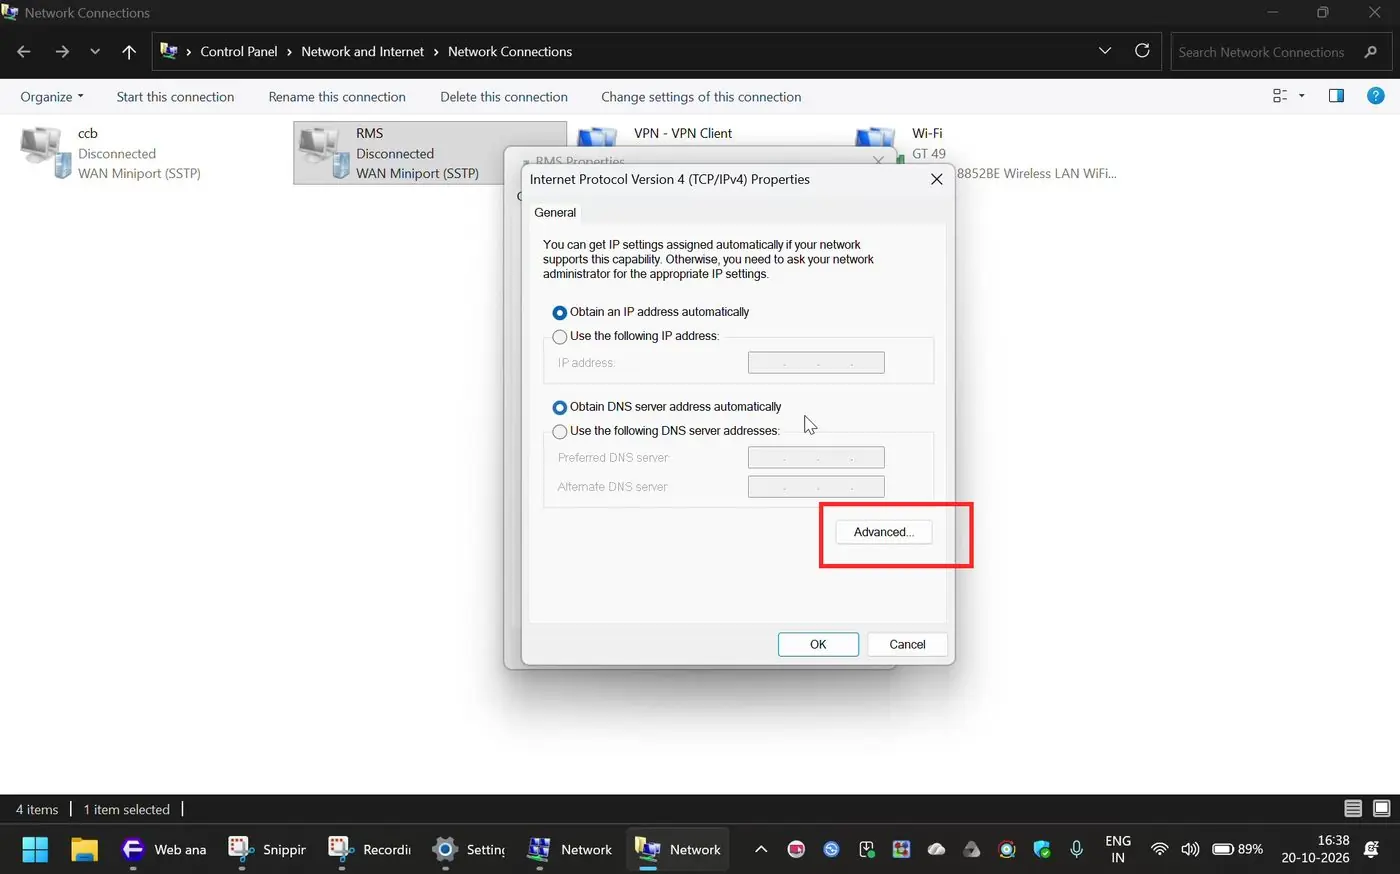
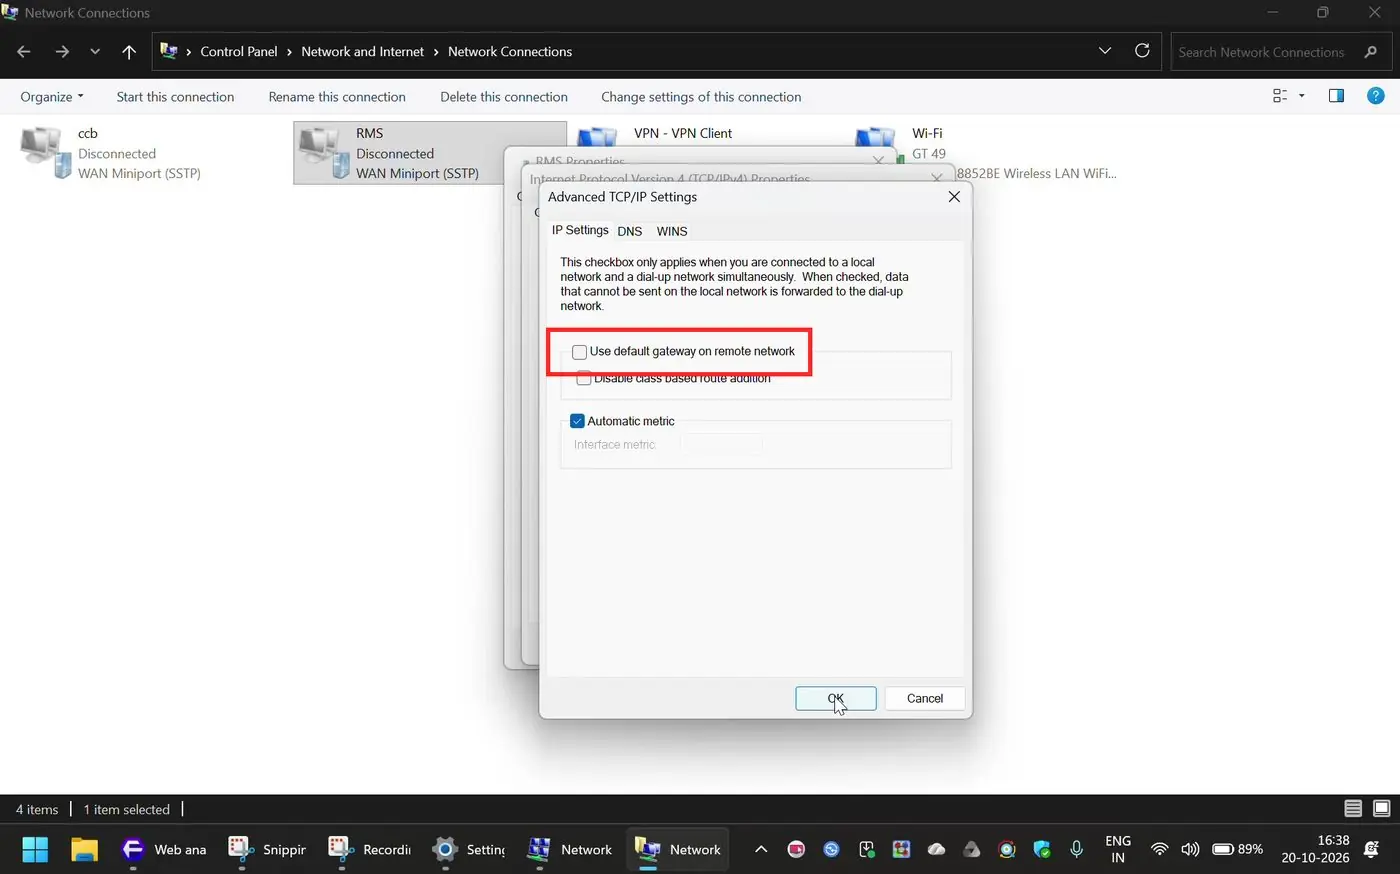
Step 10: Untick "Use default gateway on remote network"
In the Advanced TCP/IP Settings window, the box Use default gateway on remote network is ticked by default:
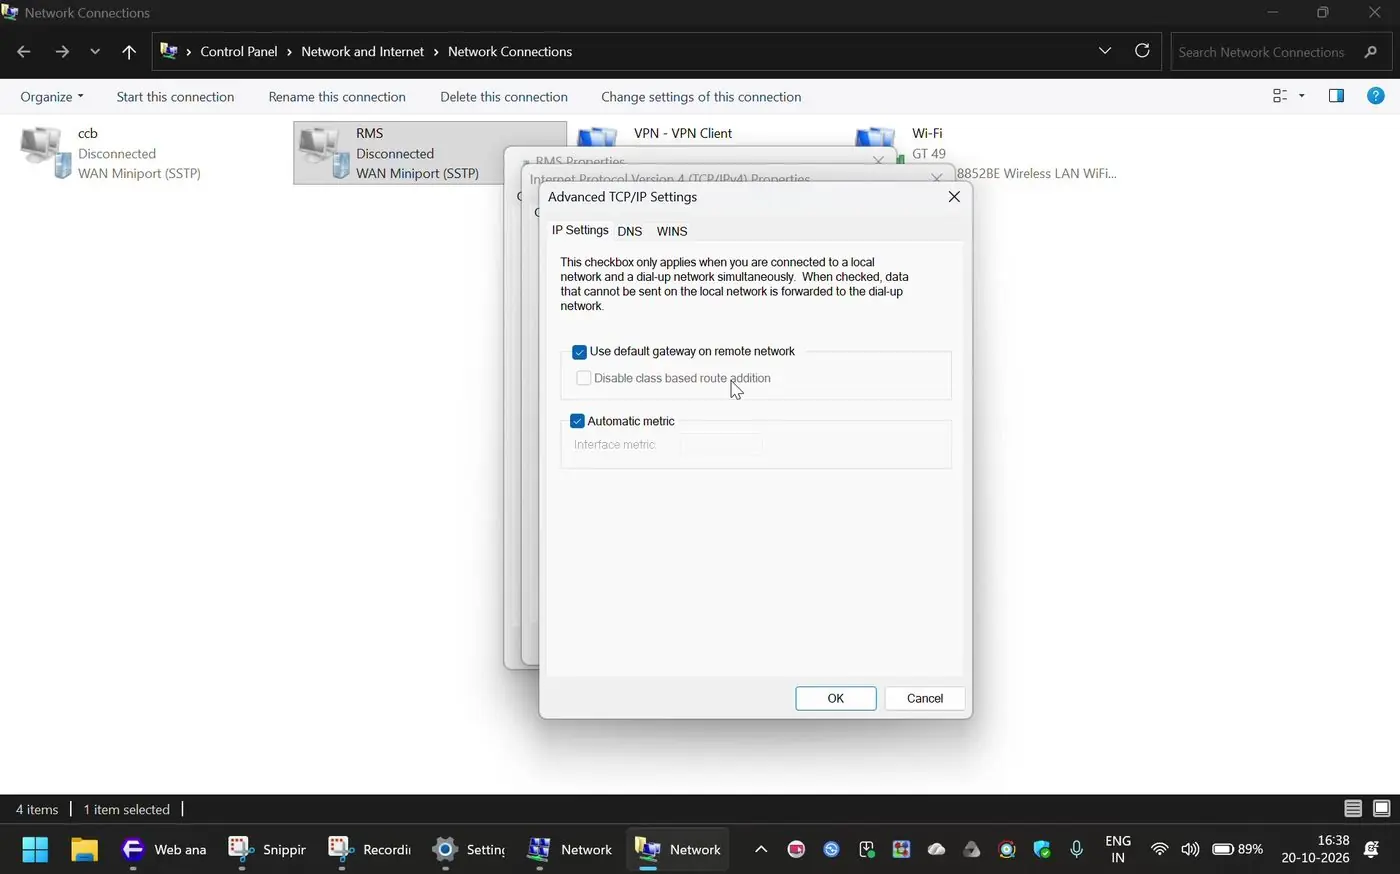
Untick it, then click OK. Click OK again in the IPv4 window and once more in the RMS Properties window to save.
Part 3: Connect to RMS every day
After the setup, connecting is quick. You do not need to open Settings again.
Step 11: Use the VPN tile in the taskbar
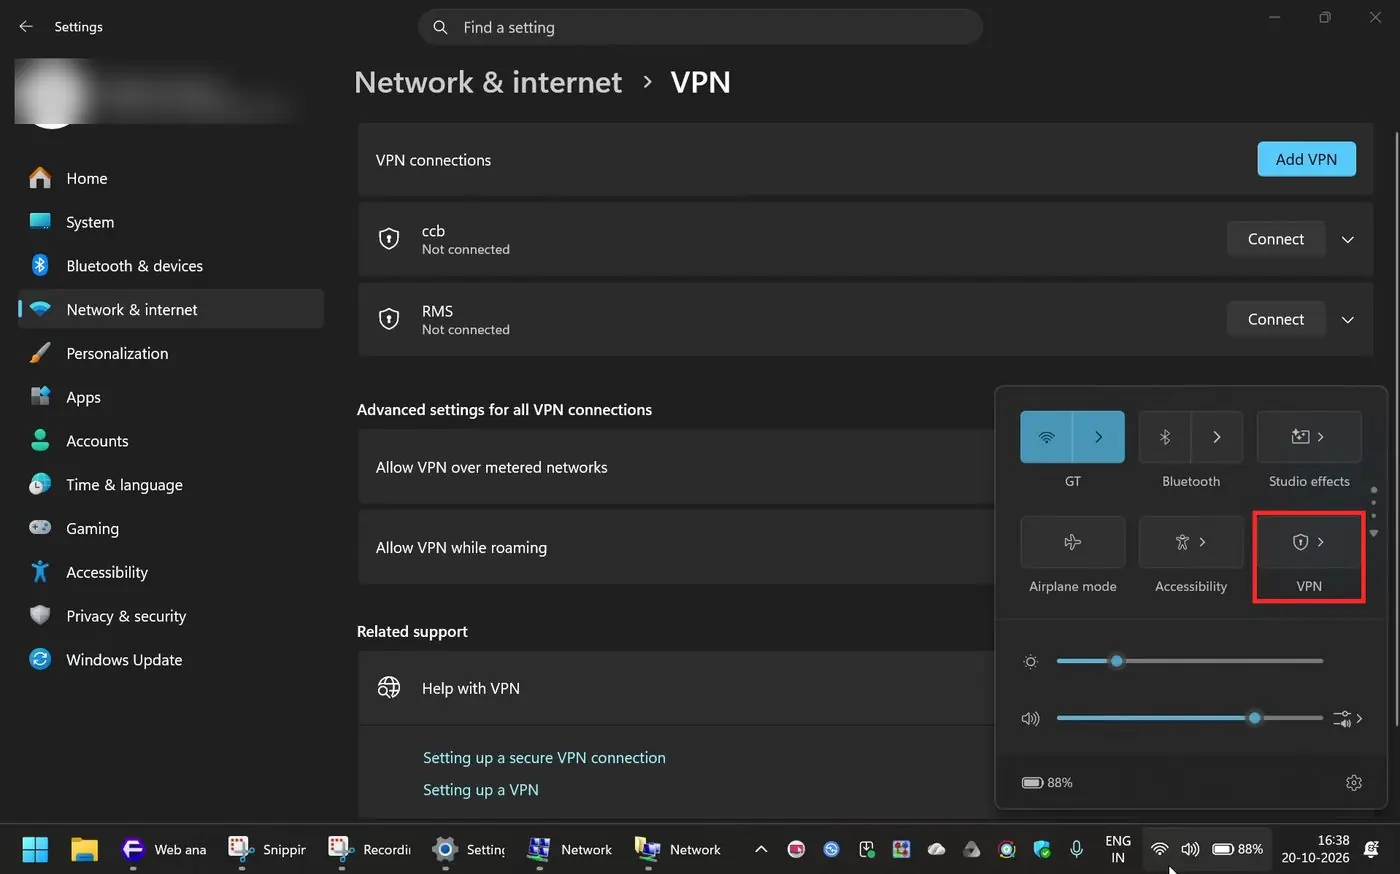
Click the Wi-Fi / volume / battery icons at the bottom right of the taskbar to open Quick Settings, then click the VPN tile. If you do not see it, click the pencil (Edit) icon in Quick Settings and add VPN.
Step 12: Select RMS and click Connect
Click RMS and then Connect. Wait for it to show Connected, and then open the RMS software or website as you normally do.
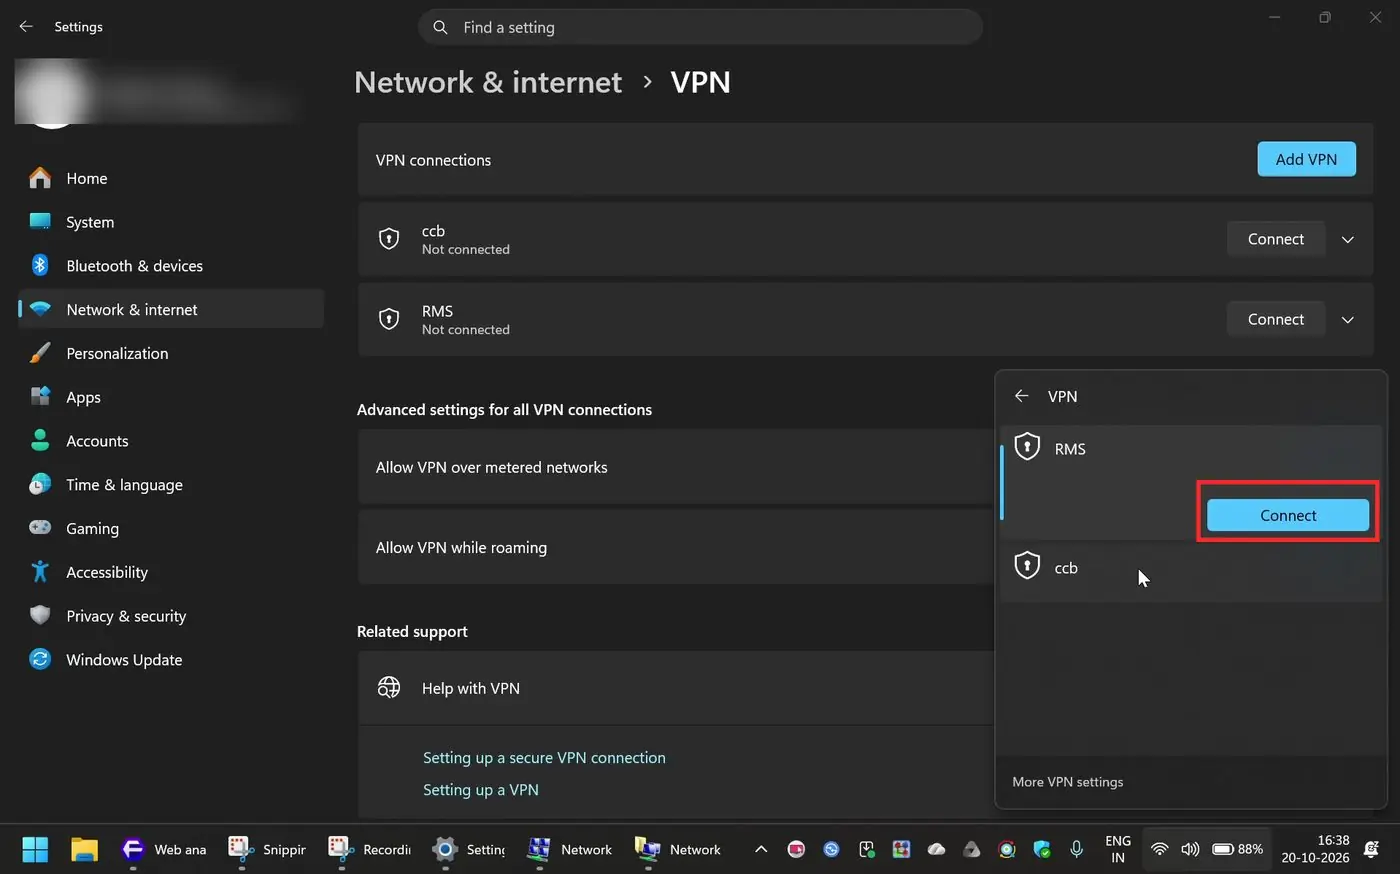
When you are done working, open the same panel and click Disconnect.
Troubleshooting
- Error 691 (access denied / authentication failed): the username or password is wrong. Edit the connection (Settings > Network & internet > VPN > click RMS > Advanced options > Edit) and re-enter them. If it still fails, ask your IT administrator whether your VPN account is active.
- Error 800 or "unable to establish": your computer cannot reach the VPN server. Check that the internet works, that the server address is typed correctly with no spaces, and try another network (for example, a mobile hotspot). Some networks block port 443 to unknown servers.
- Stuck on "Verifying your sign-in info": click Cancel, wait ten seconds, and try again. Also check that your computer's date and time are correct, because encrypted connections fail when the clock is wrong.
- Connected, but RMS does not open: confirm you are using the correct RMS address given by your office, and try closing and reopening the browser.
- Internet became slow while connected: repeat Part 2 and make sure "Use default gateway on remote network" is unticked.
That's it. After setup, only two clicks are needed to connect to the VPN. Also, in some cases, the connection and browsing speed seem higher than SoftEther.
Have questions about this article or your electricity bill?
Post your question in our Community Q&A Forum to get verified answers from engineers and consumers.
Ask in the Community Forum →
💬 Reader Discussion 0 comments
Share your thoughts, questions, or field experiencesNo comments yet
Be the first to share your thoughts, clarification, or question regarding this article!